Webサイトで「ボタンをクリックしたら特定の要素まで自動でスクロールしたい」ときに便利なのが、JavaScriptのscrollIntoView()です。シンプルに書ける一方で、いざ実装すると「スクロール位置がずれる」「固定ヘッダーに要素が隠れる」「なぜか動かない」など、予想外のトラブルに遭遇する方も多いはずです。特にスマホやブラウザごとに挙動が違うこともあり、正しく使いこなせていないとユーザー体験を損ねてしまいます。
この記事では、scrollIntoView()の基本から実践的な使い方まで、分かりやすいコード例を交えて解説します。さらに、よくある不具合の原因と対処法、そしてUXやSEOの観点からも安心して使える応用テクニックまでまとめています。「動かないから諦める」ではなく、実務でしっかり使いこなせるレベルにステップアップできる内容です。
「見た目にも自然で、使いやすく、そして安心して動くスクロール処理」を目指す方にぴったりの記事です。
格安ドメイン取得サービス─ムームードメイン─JavaScriptのscrollIntoView基本と実装例
scrollIntoViewとは?基本の書き方と便利な引数(オプション)
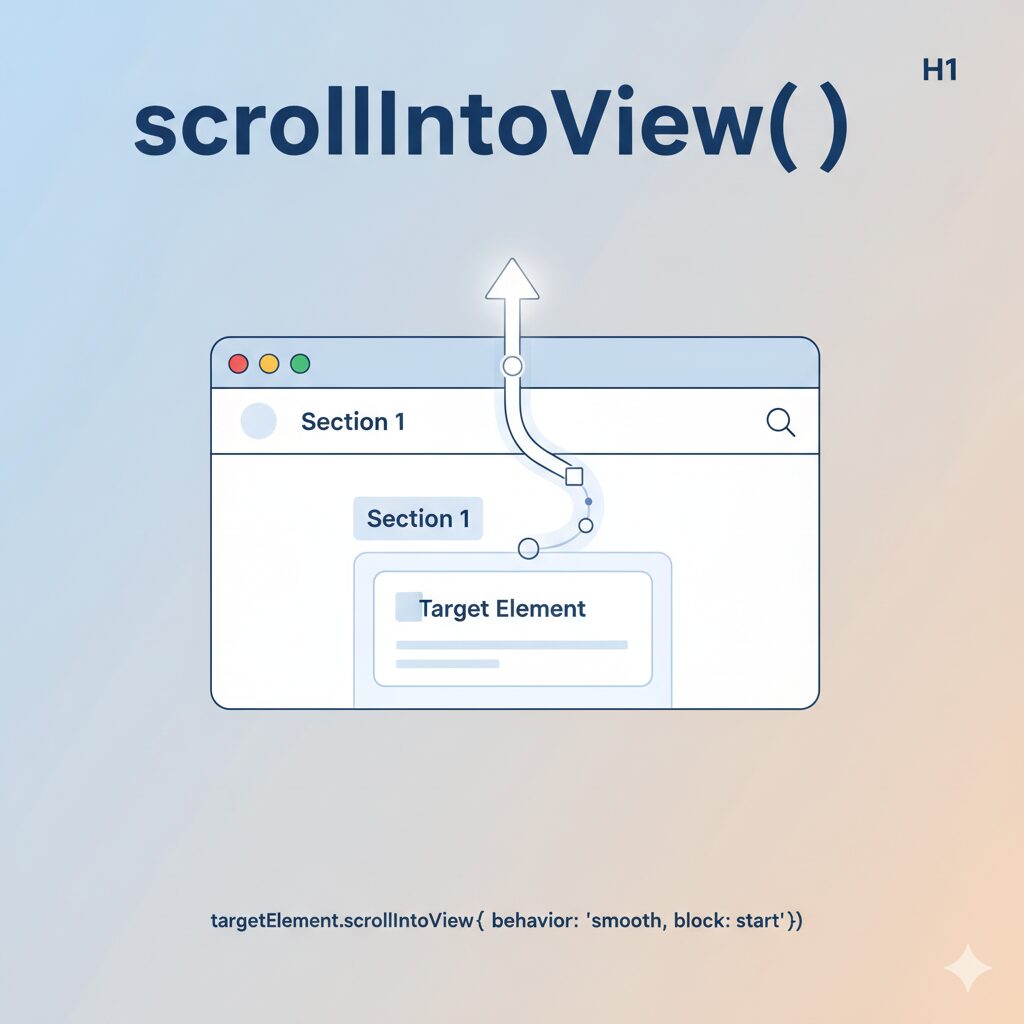
scrollIntoViewは、JavaScriptでページ内の特定の要素まで自動的にスクロールさせるメソッドです。例えば、「お問い合わせはこちら」ボタンをクリックしたときに、ページ下部のフォームまでスムーズに移動させる機能を簡単に実装できます。

基本的な使い方
最もシンプルな使い方は、以下のように引数なしで呼び出す方法です:
▼HTML
<div class="content">
  <h1>ページトップ</h1>
  <button onclick="scrollToTarget()">目的の要素までスクロール</button>
</div>

<div class="content">
  <p>中間コンテンツ</p>
</div>

<div id="target" class="target">
  <h2>ここが目的の要素です</h2>
  <p>この要素までスクロールされました!</p>
</div>
▼CSS
.content {
  height: 800px;
  padding: 20px;
}
.target {
  background-color: #ffeb3b;
  padding: 20px;
  margin: 20px 0;
}
▼Javascipt
function scrollToTarget() {
  const targetElement = document.getElementById("target");
  targetElement.scrollIntoView();
}
実際の表示
See the Pen Untitled by watashi-xyz (@watashi-xyz) on CodePen.
月額99円から。容量最大1TB!ブログ作成におすすめのWordPressテーマ「Cocoon」も簡単インストールoptionsオブジェクトで詳細な制御
scrollIntoViewは、optionsオブジェクトを渡すことで、スクロールの動作を細かく制御できます:
element.scrollIntoView({
    behavior: 'smooth',  // スクロールの動作
    block: 'start',      // 縦方向の位置
    inline: 'nearest'    // 横方向の位置
});
各オプションの詳細
behavior(スクロールの動作)
'auto':瞬間的に移動(デフォルト)'smooth':滑らかなアニメーション付きで移動
block(縦方向の表示位置)
'start':要素を画面の上端に配置'center':要素を画面の中央に配置'end':要素を画面の下端に配置'nearest':最も近い位置に配置(デフォルト)
inline(横方向の表示位置)
'start':要素を画面の左端に配置'center':要素を画面の中央に配置'end':要素を画面の右端に配置'nearest':最も近い位置に配置(デフォルト)
スムーズスクロールを実装!behavior: smoothの正しい使い方
behavior: smoothを指定することで、ページ内リンクのように瞬間的に移動するのではなく、アニメーション付きの滑らかなスクロールを実現できます。これにより、ユーザーはどこに移動したかを視覚的に理解しやすくなります。
▼HTML
<div id="section1" class="section section1">
  <h1>セクション 1</h1>
  <button class="nav-button" onclick="smoothScrollTo('section2')">セクション2へ移動</button>
  <button class="nav-button" onclick="smoothScrollTo('section3')">セクション3へ移動</button>
</div>

<div id="section2" class="section section2">
  <h1>セクション 2</h1>
  <button class="nav-button" onclick="smoothScrollTo('section1')">セクション1へ戻る</button>
  <button class="nav-button" onclick="smoothScrollTo('section3')">セクション3へ移動</button>
</div>

<div id="section3" class="section section3">
  <h1>セクション 3</h1>
  <button class="nav-button" onclick="smoothScrollTo('section1')">セクション1へ戻る</button>
  <button class="nav-button" onclick="smoothScrollTo('section2')">セクション2へ戻る</button>
</div>
▼CSS
body {
  margin: 0;
  font-family: Arial, sans-serif;
}
.section {
  height: 100vh;
  padding: 50px;
  display: flex;
  align-items: center;
  justify-content: center;
  flex-direction: column;
}
.section1 {
  background-color: #e3f2fd;
}
.section2 {
  background-color: #f3e5f5;
}
.section3 {
  background-color: #e8f5e8;
}
.nav-button {
  padding: 12px 24px;
  margin: 10px;
  background-color: #1976d2;
  color: white;
  border: none;
  border-radius: 4px;
  cursor: pointer;
  font-size: 16px;
}
.nav-button:hover {
  background-color: #1565c0;
}
▼Javascript
function smoothScrollTo(targetId) {
  const targetElement = document.getElementById(targetId);

  // 要素が存在するかチェック
  if (targetElement) {
    targetElement.scrollIntoView({
      behavior: "smooth",
      block: "start"
    });
  } else {
    console.error("指定された要素が見つかりません:", targetId);
  }
}
実際の表示
See the Pen Untitled by watashi-xyz (@watashi-xyz) on CodePen.
専門的な知識不要!誰でも簡単に使える『XWRITE(エックスライト)』window.scrollTo・scrollBy・アンカーリンクとの使い分け
JavaScriptでスクロールを制御する方法はいくつかあります。それぞれの特徴と適用場面を理解して、最適な方法を選択しましょう:
| 方法 | 特徴 | メリット | デメリット |
|---|---|---|---|
scrollIntoView | 要素を基準にスクロール | ・要素の位置を自動計算 ・レスポンシブ対応が簡単 ・コードがシンプル | ・細かい位置調整が難しい |
window.scrollTo | 画面座標を指定してスクロール | ・ピクセル単位で正確な位置指定 ・複数要素の位置を考慮可能 | ・座標計算が必要 ・レスポンシブ対応が複雑 |
window.scrollBy | 現在位置からの相対移動 | ・現在位置を基準にした移動 ・段階的なスクロールに便利 | ・目的の位置が不明確 ・現在位置に依存 |
| HTMLアンカーリンク | HTML標準の機能 | ・JavaScript不要 ・SEOに有利 ・ブラウザ標準機能 | ・スムーズスクロールはCSS依存 ・カスタマイズ性が低い |
実装例での比較
▼HTML
<div class="controls">
  <h2>各スクロール方法を試してみる</h2>

  <!-- scrollIntoView -->
  <button onclick="useScrollIntoView()">scrollIntoView を使用</button>

  <!-- window.scrollTo -->
  <button onclick="useScrollTo()">window.scrollTo を使用</button>

  <!-- window.scrollBy -->
  <button onclick="useScrollBy()">window.scrollBy を使用(相対移動)</button>

  <!-- HTMLアンカーリンク -->
  <a href="#target-anchor">HTMLアンカーリンク</a>
</div>

<div class="content">
  <h3>コンテンツ 1</h3>
  <p>スクロールのテスト用コンテンツです。</p>
</div>

<div class="content">
  <h3>コンテンツ 2</h3>
  <p>もう少しスクロールが必要です。</p>
</div>

<div id="target" class="target">
  <h3 id="target-anchor">ターゲット要素</h3>
  <p>各種スクロール方法でここまで移動します。</p>
</div>

<div class="content">
  <h3>コンテンツ 3</h3>
  <p>ターゲットより下のコンテンツです。</p>
</div>
▼CSS
.content {
  height: 600px;
  padding: 20px;
  border: 1px solid #ccc;
  margin: 10px 0;
}
.target {
  background-color: #ffeb3b;
  padding: 20px;
}
button {
  padding: 10px 15px;
  margin: 5px;
  cursor: pointer;
}
▼Javascript
function useScrollIntoView() {
  const target = document.getElementById("target");
  target.scrollIntoView({ behavior: "smooth", block: "center" });
}

function useScrollTo() {
  const target = document.getElementById("target");
  const targetPosition = target.offsetTop;
  window.scrollTo({
    top: targetPosition - 100, // 100px上にオフセット
    behavior: "smooth"
  });
}

function useScrollBy() {
  // 現在位置から500px下に移動
  window.scrollBy({
    top: 500,
    behavior: "smooth"
  });
}
実際の表示
See the Pen Untitled by watashi-xyz (@watashi-xyz) on CodePen.
選び方の指針:
- 要素へのスクロールなら
scrollIntoView– 最もシンプルで直感的 - 画面座標なら
window.scrollTo– ピクセル単位での正確な制御が必要な場合 - 相対移動なら
window.scrollBy– 現在位置から一定距離移動したい場合 - シンプルなページ内リンクならHTMLアンカー – JavaScript不要でSEOにも有利
コストパフォーマンスに優れた高性能なレンタルサーバー
【Hostinger】scrollIntoViewのよくある不具合とその対処法
実際にWebサイトでscrollIntoViewを使用すると、「思った通りに動かない」「位置がずれる」「効かない」といった問題に遭遇することがあります。ここでは、そうした頻発する問題とその解決策を具体的なコード例とともに詳しく解説します。
固定ヘッダーで要素が隠れる問題とscroll-margin-topの活用
問題の詳細
固定ヘッダー(position: fixed)があるWebサイトでは、scrollIntoViewでスクロールした際に、目的の要素がヘッダーの下に隠れてしまう問題がよく発生します。これは、scrollIntoViewがヘッダーの存在を考慮せずにスクロール位置を計算するためです。
▼HTML
<div class="header">
  <h1>固定ヘッダー(高さ80px)</h1>
</div>

<div class="content" style="margin-top: 80px;">
  <h2>ページトップコンテンツ</h2>
  <button onclick="scrollToTarget()">ターゲットセクションへ移動</button>
  <p>固定ヘッダーがある場合の問題を確認してみましょう。</p>
</div>

<div class="content">
  <h3>中間コンテンツ 1</h3>
  <p>スクロールのためのコンテンツです。</p>
</div>

<div class="content">
  <h3>中間コンテンツ 2</h3>
  <p>もう少しスクロールが必要です。</p>
</div>

<!-- 問題:この要素がヘッダーに隠れてしまう -->
<div id="target" class="target-section">
  <h2>ターゲットセクション</h2>
  <p>ここが目的の要素ですが、ヘッダーに隠れてしまいます!</p>
</div>

<div class="content">
  <h3>下部コンテンツ</h3>
  <p>ターゲットより下のコンテンツです。</p>
</div>
▼CSS
body {
  margin: 0;
  font-family: Arial, sans-serif;
}

/* 問題のある固定ヘッダー */
.header {
  position: fixed;
  top: 0;
  left: 0;
  right: 0;
  height: 80px;
  background-color: #1976d2;
  color: white;
  display: flex;
  align-items: center;
  justify-content: center;
  z-index: 1000;
  box-shadow: 0 2px 4px rgba(0, 0, 0, 0.1);
}

.content {
  height: 600px;
  padding: 20px;
  border-bottom: 1px solid #eee;
}

.target-section {
  background-color: #ffeb3b;
  padding: 20px;
  margin: 100px 0;
}

button {
  padding: 12px 20px;
  background-color: #4caf50;
  color: white;
  border: none;
  border-radius: 4px;
  cursor: pointer;
  margin: 10px;
}
▼Javascript
function scrollToTarget() {
  const target = document.getElementById("target");
  // 問題のあるコード:ヘッダー分が考慮されない
  target.scrollIntoView({ behavior: "smooth", block: "start" });
}
実際の表示
See the Pen scrollintoview-04 by watashi-xyz (@watashi-xyz) on CodePen.
【不要なパソコンを送るだけ】パソコン無料処分サービス『送壊ゼロ』解決策1:CSSのscroll-margin-topを使用
最もモダンで推奨される解決方法は、CSSのscroll-margin-topプロパティを使用することです。これにより、スクロール先の要素に対して上部のマージンを設定できます。
▼HTML
<div class="header">
  <h1>固定ヘッダー(高さ80px)</h1>
</div>

<div class="content" style="margin-top: 80px;">
  <h2>ページトップコンテンツ</h2>
  <button onclick="scrollToTarget()">ターゲットセクションへ移動(修正版)</button>
  <p>scroll-margin-topで問題を解決した例です。</p>
</div>

<div class="content">
  <h3>中間コンテンツ 1</h3>
  <p>スクロールのためのコンテンツです。</p>
</div>

<div class="content">
  <h3>中間コンテンツ 2</h3>
  <p>もう少しスクロールが必要です。</p>
</div>

<div id="target" class="target-section">
  <h2>ターゲットセクション</h2>
  <p>今度は正しく表示されます!</p>
</div>

<div class="content">
  <h3>下部コンテンツ</h3>
  <p>ターゲットより下のコンテンツです。</p>
</div>
▼CSS
body {
  margin: 0;
  font-family: Arial, sans-serif;
}

.header {
  position: fixed;
  top: 0;
  left: 0;
  right: 0;
  height: 80px;
  background-color: #1976d2;
  color: white;
  display: flex;
  align-items: center;
  justify-content: center;
  z-index: 1000;
  box-shadow: 0 2px 4px rgba(0, 0, 0, 0.1);
}

.content {
  height: 600px;
  padding: 20px;
  border-bottom: 1px solid #eee;
}

/* 解決策:scroll-margin-topでヘッダー分のマージンを設定 */
.target-section {
  background-color: #ffeb3b;
  padding: 20px;
  margin: 100px 0;
  scroll-margin-top: 100px; /* ヘッダーの高さ + 余裕分 */
}

button {
  padding: 12px 20px;
  background-color: #4caf50;
  color: white;
  border: none;
  border-radius: 4px;
  cursor: pointer;
  margin: 10px;
}
▼Javascript
function scrollToTarget() {
  const target = document.getElementById("target");
  // scroll-margin-topが設定されているので、正しくスクロールされる
  target.scrollIntoView({ behavior: "smooth", block: "start" });
}
実際の表示
See the Pen Untitled by watashi-xyz (@watashi-xyz) on CodePen.
国内シェアNo.1のエックスサーバーが提供するVPSサーバー『XServer VPS』解決策2:JavaScriptでオフセット計算
古いブラウザ対応が必要な場合や、より細かい制御が必要な場合は、JavaScriptで直接計算する方法もあります:
function scrollToTargetWithOffset() {
    const target = document.getElementById('target');
    const headerHeight = 80; // ヘッダーの高さ
    const offset = 20; // 追加の余裕

    const targetPosition = target.offsetTop - headerHeight - offset;

    window.scrollTo({
        top: targetPosition,
        behavior: 'smooth'
    });
}
スクロール位置がずれる原因と調整方法
よくあるずれの原因
スクロール位置が微妙にずれる問題は、以下のような要因で発生します:
- 要素のmarginやpadding
- ボーダーの太さ
- 親要素のoverflow設定
- フォントサイズやline-heightの計算誤差
▼HTML
<div class="controls">
  <div>
    <button onclick="scrollToProblematic()">問題のある要素へ</button>
    <button onclick="scrollToAdjusted()">調整済み要素へ</button>
  </div>
  <div>
    <button onclick="scrollToTop()">トップへ戻る</button>
  </div>
</div>

<div class="container">
  <div class="section">
    <h1>スクロール位置ずれの検証</h1>
    <p>以下のボタンで各セクションに移動して、位置のずれを確認してみましょう。</p>
  </div>

  <div class="section">
    <h2>通常のセクション 1</h2>
    <p>基準となるセクションです。ここは正常にスクロールされます。</p>
  </div>

  <div class="section">
    <h2>通常のセクション 2</h2>
    <p>もう一つの基準セクションです。</p>
  </div>

  <div id="problematic" class="section problematic-section">
    <h2>問題のあるセクション</h2>
    <p>このセクションは大きなmargin、padding、太いボーダーがあるため、スクロール位置がずれる可能性があります。</p>
    <p>実際のWebサイトでは、このような予期しないスタイルがずれの原因となることがあります。</p>
  </div>

  <div class="section">
    <h2>中間セクション</h2>
    <p>問題のあるセクションと調整済みセクションの間のコンテンツです。</p>
  </div>

  <div id="adjusted" class="section adjusted-section">
    <h2>調整済みセクション</h2>
    <p>このセクションはscroll-margin-topで位置を調整済みです。</p>
    <p>適切に表示位置が調整されているはずです。</p>
  </div>

  <div class="section">
    <h2>最後のセクション</h2>
    <p>検証用の最後のコンテンツです。</p>
  </div>
</div>
▼CSS
body {
  margin: 0;
  font-family: Arial, sans-serif;
  line-height: 1.6;
}

.container {
  max-width: 800px;
  margin: 0 auto;
  padding: 0 20px;
}

.section {
  min-height: 500px;
  padding: 40px 20px;
  margin-bottom: 40px;
  border: 3px solid #ddd;
  border-radius: 8px;
}

/* 問題のある要素:大きなmarginとpadding */
.problematic-section {
  background-color: #ffebee;
  margin: 60px 0; /* 大きなマージン */
  padding: 50px; /* 大きなパディング */
  border: 5px solid #f44336; /* 太いボーダー */
}

/* 調整済みの要素 */
.adjusted-section {
  background-color: #e8f5e8;
  margin: 20px 0;
  padding: 30px;
  border: 2px solid #4caf50;
  /* scroll-marginで微調整 */
  scroll-margin-top: 30px;
}

button {
  padding: 12px 20px;
  background-color: #2196f3;
  color: white;
  border: none;
  border-radius: 4px;
  cursor: pointer;
  margin: 10px 5px;
}

.controls {
  position: fixed;
  top: 20px;
  right: 20px;
  background-color: white;
  padding: 15px;
  border: 1px solid #ccc;
  border-radius: 8px;
  box-shadow: 0 2px 10px rgba(0, 0, 0, 0.1);
  z-index: 1000;
}
▼Javascript
function scrollToProblematic() {
  const target = document.getElementById("problematic");
  target.scrollIntoView({
    behavior: "smooth",
    block: "start"
  });
}

function scrollToAdjusted() {
  const target = document.getElementById("adjusted");
  target.scrollIntoView({
    behavior: "smooth",
    block: "start"
  });
}

function scrollToTop() {
  window.scrollTo({
    top: 0,
    behavior: "smooth"
  });
}
実際の表示
See the Pen Untitled by watashi-xyz (@watashi-xyz) on CodePen.
◆◇◆ 【衝撃価格】VPS512MBプラン!1時間1.3円【ConoHa】 ◆◇◆より細かい調整方法
CSSのscroll-margin系プロパティを使って、より細かく調整できます:
/* 上部のマージン調整 */
.target-element {
    scroll-margin-top: 100px;
}

/* 全方向のマージン調整 */
.target-element {
    scroll-margin: 80px 0 20px 0; /* 上 右 下 左 */
}

/* より具体的な調整例 */
.form-section {
    scroll-margin-top: calc(80px + 2rem); /* ヘッダー + 追加余白 */
}

.mobile-adjusted {
    scroll-margin-top: 60px; /* モバイル用 */
}

@media (min-width: 768px) {
    .mobile-adjusted {
        scroll-margin-top: 80px; /* デスクトップ用 */
    }
}
scrollIntoViewが効かない時のチェックリスト
scrollIntoViewが意図した通りに動作しない場合は、以下の項目を順番にチェックしてください:
1. 対象要素の存在確認
function safeScrollToElement(elementId) {
    const target = document.getElementById(elementId);

    // 要素が存在するかチェック
    if (!target) {
        console.error(`要素が見つかりません: ${elementId}`);
        return false;
    }

    // 要素がDOMに存在し、表示されているかチェック
    if (target.offsetParent === null && target.style.display !== 'none') {
        console.warn(`要素は存在しますが非表示の可能性があります: ${elementId}`);
    }

    target.scrollIntoView({ behavior: 'smooth', block: 'start' });
    return true;
}
2. 親要素のCSS設定確認
親要素に以下のCSSプロパティが設定されていると、スクロールが正しく動作しない場合があります:
/* 問題となる可能性のあるCSS */
.parent-container {
    overflow: hidden;    /* スクロールを無効にする */
    position: fixed;     /* 位置が固定される */
    height: 100%;       /* 高さ制限でスクロール範囲が制限される */
    max-height: 500px;  /* 最大高さ制限 */
}
3. JavaScriptエラーの確認
function debugScrollIntoView(elementId) {
    try {
        console.log('スクロール開始:', elementId);

        const target = document.getElementById(elementId);
        if (!target) {
            throw new Error(`要素が見つかりません: ${elementId}`);
        }

        console.log('要素の位置情報:', {
            offsetTop: target.offsetTop,
            offsetLeft: target.offsetLeft,
            offsetWidth: target.offsetWidth,
            offsetHeight: target.offsetHeight,
            scrollTop: window.pageYOffset
        });

        target.scrollIntoView({ behavior: 'smooth', block: 'start' });

        console.log('スクロール実行完了');

    } catch (error) {
        console.error('scrollIntoViewエラー:', error);
    }
}
4. 完全なトラブルシューティング用テンプレート
▼HTML
<div id="debugInfo" class="debug-info">
  デバッグ情報が表示されます
</div>

<div class="section">
  <h2>トラブルシューティング用ページ</h2>
  <button onclick="testScrollIntoView('target1')">ターゲット1へ</button>
  <button onclick="testScrollIntoView('nonexistent')">存在しない要素へ</button>
</div>

<div class="section">
  <h3>中間コンテンツ</h3>
</div>

<div id="target1" class="target">
  <h2>ターゲット1</h2>
  <p>正常にスクロールされるべき要素</p>
</div>
▼CSS
.debug-info {
  position: fixed;
  top: 10px;
  left: 10px;
  background: #333;
  color: white;
  padding: 10px;
  font-family: monospace;
  font-size: 12px;
  max-width: 300px;
  z-index: 9999;
}

.section {
  height: 500px;
  padding: 20px;
  border-bottom: 1px solid #ccc;
}
.target {
  background-color: #ffeb3b;
  padding: 20px;
}
button {
  padding: 10px 15px;
  margin: 5px;
}
▼Javascript
function testScrollIntoView(elementId) {
  const debugInfo = document.getElementById("debugInfo");
  let debugText = `テスト開始: ${elementId}\\n`;

  try {
    // 1. 要素の存在確認
    const target = document.getElementById(elementId);
    if (!target) {
      debugText += `❌ 要素が見つかりません\\n`;
      throw new Error(`要素が見つかりません: ${elementId}`);
    }
    debugText += `✅ 要素が見つかりました\\n`;

    // 2. 要素の表示状態確認
    const isVisible = target.offsetParent !== null;
    debugText += `表示状態: ${isVisible ? "✅ 表示中" : "❌ 非表示"}\\n`;

    // 3. 親要素のoverflow確認
    let parent = target.parentElement;
    let overflowIssue = false;
    while (parent && parent !== document.body) {
      const style = window.getComputedStyle(parent);
      if (style.overflow === "hidden") {
        debugText += `⚠️ 親要素にoverflow:hiddenがあります\\n`;
        overflowIssue = true;
        break;
      }
      parent = parent.parentElement;
    }

    if (!overflowIssue) {
      debugText += `✅ overflow問題なし\\n`;
    }

    // 4. 位置情報
    debugText += `位置: ${target.offsetTop}px\\n`;
    debugText += `現在位置: ${window.pageYOffset}px\\n`;

    // 5. スクロール実行
    target.scrollIntoView({ behavior: "smooth", block: "start" });
    debugText += `✅ スクロール実行完了\\n`;
  } catch (error) {
    debugText += `❌ エラー: ${error.message}\\n`;
  }

  debugInfo.textContent = debugText;
}

// ページ読み込み時の初期チェック
window.addEventListener("load", function () {
  const debugInfo = document.getElementById("debugInfo");
  debugInfo.textContent =
    "ページ読み込み完了\\nボタンをクリックしてテストを開始してください";
});
実際の表示
See the Pen Untitled by watashi-xyz (@watashi-xyz) on CodePen.
Audibleプレミアムプラン30日間無料体験チェックリストまとめ
基本チェック項目:
CSS関連チェック項目:
スクロール動作チェック項目:
このチェックリストに従って順番に確認することで、scrollIntoViewが効かない問題のほとんどを解決できます。
実践で役立つ!scrollIntoViewの活用例と応用テクニック
scrollIntoViewの基本的な使い方を理解したら、実際のWebサイトでよく使われる実用的なパターンを学びましょう。ここでは、すぐに使える具体的な実装例と、ユーザー体験を向上させる応用テクニックを紹介します。
1行で簡単!ページトップへ戻るボタンの実装例
ページトップへ戻るボタンは、多くのWebサイトで必要な機能です。従来はwindow.scrollTo(0, 0)を使うことが多かったですが、scrollIntoViewを使うとより直感的に実装できます。
基本的な実装
▼HTML
<!-- ページトップのターゲット要素 -->
<div id="page-top">
  <div class="content">
    <h1>ページトップへ戻るボタンのデモ</h1>
    <p>下にスクロールすると、右下にページトップへ戻るボタンが表示されます。</p>
    <p>ボタンをクリックすると、スムーズにページトップまで戻ります。</p>
  </div>
</div>

<div class="section">
  <h2>セクション 1</h2>
  <p>コンテンツをたくさん配置して、スクロールが必要な状況を作ります。</p>
</div>

<div class="section">
  <h2>セクション 2</h2>
  <p>さらにコンテンツを追加します。</p>
</div>

<div class="section">
  <h2>セクション 3</h2>
  <p>もう少しスクロールしてみましょう。</p>
</div>

<div class="section">
  <h2>セクション 4</h2>
  <p>ここまでスクロールすると、ページトップへ戻るボタンが便利になります。</p>
</div>

<div class="section">
  <h2>セクション 5</h2>
  <p>最後のセクションです。ボタンをクリックしてページトップに戻ってみてください。</p>
</div>

<!-- ページトップへ戻るボタン -->
<button id="scrollToTopBtn" class="scroll-to-top" onclick="scrollToPageTop()">
  ↑
</button>
▼CSS
body {
  margin: 0;
  font-family: Arial, sans-serif;
  line-height: 1.6;
}

.content {
  height: 800px;
  padding: 40px;
  border-bottom: 1px solid #eee;
}

/* ページトップへ戻るボタンのスタイル */
.scroll-to-top {
  position: fixed;
  bottom: 30px;
  right: 30px;
  width: 60px;
  height: 60px;
  background-color: #2196f3;
  color: white;
  border: none;
  border-radius: 50%;
  cursor: pointer;
  font-size: 20px;
  box-shadow: 0 4px 12px rgba(0, 0, 0, 0.15);
  opacity: 0;
  visibility: hidden;
  transition: all 0.3s ease;
  z-index: 1000;
}

.scroll-to-top:hover {
  background-color: #1976d2;
  transform: translateY(-2px);
  box-shadow: 0 6px 16px rgba(0, 0, 0, 0.2);
}

/* ボタンが表示される状態 */
.scroll-to-top.visible {
  opacity: 1;
  visibility: visible;
}

.section {
  background-color: #f5f5f5;
  margin: 20px 0;
  padding: 30px;
  border-radius: 8px;
}
▼Javascript
// ページトップへ戻る関数(1行で実装!)
function scrollToPageTop() {
  document.getElementById("page-top").scrollIntoView({
    behavior: "smooth"
  });
}

// スクロール位置に応じてボタンの表示/非表示を切り替え
window.addEventListener("scroll", function () {
  const scrollToTopBtn = document.getElementById("scrollToTopBtn");

  // 300px以上スクロールしたらボタンを表示
  if (window.pageYOffset > 300) {
    scrollToTopBtn.classList.add("visible");
  } else {
    scrollToTopBtn.classList.remove("visible");
  }
});

// 代替案:document.bodyを使う場合
function alternativeScrollToTop() {
  document.body.scrollIntoView({
    behavior: "smooth"
  });
}
実際の表示
See the Pen scrollintoview-08 by watashi-xyz (@watashi-xyz) on CodePen.
通信無制限なのに工事不要!【SoftbankAir】より高度な実装:スクロール進捗表示付き
▼HTML
<div id="page-top">
  <div class="content">
    <h1>進捗表示付きページトップボタン</h1>
    <p>スクロールすると、ページトップボタンが進捗と一緒に表示されます。</p>
  </div>
</div>

<div class="content">
  <h2>コンテンツ 1</h2>
</div>
<div class="content">
  <h2>コンテンツ 2</h2>
</div>
<div class="content">
  <h2>コンテンツ 3</h2>
</div>
<div class="content">
  <h2>コンテンツ 4</h2>
</div>
<div class="content">
  <h2>コンテンツ 5</h2>
</div>

<button id="progressBtn" class="scroll-progress-btn" onclick="scrollToPageTop()">
  <div class="progress-circle">
    <div class="progress-inner">↑</div>
  </div>
</button>
▼CSS
body {
  margin: 0;
  font-family: Arial, sans-serif;
}

.content {
  height: 600px;
  padding: 40px;
  border-bottom: 1px solid #eee;
}

/* 進捗表示付きボタン */
.scroll-progress-btn {
  position: fixed;
  bottom: 30px;
  right: 30px;
  width: 60px;
  height: 60px;
  background: transparent;
  border: none;
  cursor: pointer;
  opacity: 0;
  visibility: hidden;
  transition: all 0.3s ease;
  z-index: 1000;
}

.scroll-progress-btn.visible {
  opacity: 1;
  visibility: visible;
}

/* 円形の進捗バー */
.progress-circle {
  width: 100%;
  height: 100%;
  border-radius: 50%;
  background: conic-gradient(#2196f3 var(--progress), #e0e0e0 0);
  display: flex;
  align-items: center;
  justify-content: center;
  transition: transform 0.2s ease;
}

.scroll-progress-btn:hover .progress-circle {
  transform: scale(1.1);
}

/* 内側の円とアイコン */
.progress-inner {
  width: 45px;
  height: 45px;
  border-radius: 50%;
  background-color: white;
  display: flex;
  align-items: center;
  justify-content: center;
  font-size: 18px;
  color: #2196f3;
  font-weight: bold;
}
▼Javascript
function scrollToPageTop() {
  document.getElementById("page-top").scrollIntoView({
    behavior: "smooth"
  });
}

window.addEventListener("scroll", function () {
  const btn = document.getElementById("progressBtn");
  const circle = btn.querySelector(".progress-circle");

  const scrollTop = window.pageYOffset;
  const docHeight = document.body.scrollHeight - window.innerHeight;
  const scrollPercent = (scrollTop / docHeight) * 100;

  // 進捗をCSS変数で設定
  circle.style.setProperty("--progress", scrollPercent + "%");

  // 10%以上スクロールしたら表示
  if (scrollPercent > 10) {
    btn.classList.add("visible");
  } else {
    btn.classList.remove("visible");
  }
});
実際の表示
See the Pen scrollintoview-09 by watashi-xyz (@watashi-xyz) on CodePen.
あなたのサイトのURL、そろそろスリムにしませんか?フォームのエラー箇所に自動スクロールさせる実装方法
フォームバリデーション後に、最初のエラー項目まで自動スクロールすることで、ユーザーが修正箇所をすぐに見つけられるようになります。
▼HTML
<div class="header">
  <h1>お問い合わせフォーム</h1>
</div>

<div class="main-content">
  <div class="container">
    <div id="successMessage" class="success-message">
      フォームが正常に送信されました!
    </div>

    <form id="contactForm" novalidate>
      <div id="nameGroup" class="form-group">
        <label for="name">お名前 *</label>
        <input type="text" id="name" name="name" required>
        <div class="error-message">お名前を入力してください</div>
      </div>

      <div id="emailGroup" class="form-group">
        <label for="email">メールアドレス *</label>
        <input type="email" id="email" name="email" required>
        <div class="error-message">有効なメールアドレスを入力してください</div>
      </div>

      <div id="phoneGroup" class="form-group">
        <label for="phone">電話番号</label>
        <input type="tel" id="phone" name="phone">
        <div class="error-message">有効な電話番号を入力してください</div>
      </div>

      <div id="companyGroup" class="form-group">
        <label for="company">会社名 *</label>
        <input type="text" id="company" name="company" required>
        <div class="error-message">会社名を入力してください</div>
      </div>

      <div id="subjectGroup" class="form-group">
        <label for="subject">お問い合わせ種別 *</label>
        <select id="subject" name="subject" required>
          <option value="">選択してください</option>
          <option value="general">一般的なお問い合わせ</option>
          <option value="support">サポート</option>
          <option value="sales">営業関連</option>
        </select>
        <div class="error-message">お問い合わせ種別を選択してください</div>
      </div>

      <div id="messageGroup" class="form-group">
        <label for="message">お問い合わせ内容 *</label>
        <textarea id="message" name="message" rows="5" required></textarea>
        <div class="error-message">お問い合わせ内容を入力してください(10文字以上)</div>
      </div>

      <button type="submit" class="submit-btn">送信</button>
    </form>
  </div>
</div>
▼CSS
body {
  margin: 0;
  font-family: Arial, sans-serif;
  line-height: 1.6;
  background-color: #f5f5f5;
}

.container {
  max-width: 600px;
  margin: 0 auto;
  padding: 20px;
  background-color: white;
  box-shadow: 0 2px 10px rgba(0, 0, 0, 0.1);
}

.form-group {
  margin-bottom: 25px;
  padding: 15px 0;
}

.form-group label {
  display: block;
  margin-bottom: 8px;
  font-weight: bold;
  color: #333;
}

.form-group input,
.form-group textarea,
.form-group select {
  width: 100%;
  padding: 12px;
  border: 2px solid #ddd;
  border-radius: 4px;
  font-size: 16px;
  transition: border-color 0.3s ease;
}

.form-group input:focus,
.form-group textarea:focus,
.form-group select:focus {
  outline: none;
  border-color: #2196f3;
}

/* エラー状態のスタイル */
.form-group.error {
  scroll-margin-top: 100px; /* スクロール時の調整 */
}

.form-group.error input,
.form-group.error textarea,
.form-group.error select {
  border-color: #f44336;
  background-color: #ffebee;
}

.error-message {
  color: #f44336;
  font-size: 14px;
  margin-top: 5px;
  display: none;
}

.form-group.error .error-message {
  display: block;
}

.submit-btn {
  width: 100%;
  padding: 15px;
  background-color: #4caf50;
  color: white;
  border: none;
  border-radius: 4px;
  font-size: 16px;
  cursor: pointer;
  transition: background-color 0.3s ease;
}

.submit-btn:hover {
  background-color: #45a049;
}

.header {
  height: 80px;
  background-color: #1976d2;
  color: white;
  display: flex;
  align-items: center;
  justify-content: center;
  position: fixed;
  top: 0;
  left: 0;
  right: 0;
  z-index: 1000;
}

.main-content {
  margin-top: 80px;
}

.success-message {
  background-color: #e8f5e8;
  color: #4caf50;
  padding: 15px;
  border-radius: 4px;
  margin-bottom: 20px;
  display: none;
}
▼Javascript
document.getElementById("contactForm").addEventListener("submit", function (e) {
  e.preventDefault();

  // エラーをリセット
  clearAllErrors();

  // バリデーション実行
  const errors = validateForm();

  if (errors.length > 0) {
    // エラーがある場合、最初のエラー項目にスクロール
    scrollToFirstError(errors);
  } else {
    // エラーがない場合、成功メッセージを表示
    showSuccessMessage();
  }
});

function validateForm() {
  const errors = [];

  // 名前チェック
  const name = document.getElementById("name");
  if (!name.value.trim()) {
    errors.push({
      element: name,
      groupId: "nameGroup",
      message: "お名前を入力してください"
    });
  }

  // メールアドレスチェック
  const email = document.getElementById("email");
  const emailRegex = /^[^\\s@]+@[^\\s@]+\\.[^\\s@]+$/;
  if (!email.value.trim()) {
    errors.push({
      element: email,
      groupId: "emailGroup",
      message: "メールアドレスを入力してください"
    });
  } else if (!emailRegex.test(email.value)) {
    errors.push({
      element: email,
      groupId: "emailGroup",
      message: "有効なメールアドレスを入力してください"
    });
  }

  // 電話番号チェック(任意だが、入力されている場合は形式チェック)
  const phone = document.getElementById("phone");
  const phoneRegex = /^[\\d\\-\\(\\)\\s]+$/;
  if (phone.value.trim() && !phoneRegex.test(phone.value)) {
    errors.push({
      element: phone,
      groupId: "phoneGroup",
      message: "有効な電話番号を入力してください"
    });
  }

  // 会社名チェック
  const company = document.getElementById("company");
  if (!company.value.trim()) {
    errors.push({
      element: company,
      groupId: "companyGroup",
      message: "会社名を入力してください"
    });
  }

  // お問い合わせ種別チェック
  const subject = document.getElementById("subject");
  if (!subject.value) {
    errors.push({
      element: subject,
      groupId: "subjectGroup",
      message: "お問い合わせ種別を選択してください"
    });
  }

  // お問い合わせ内容チェック
  const message = document.getElementById("message");
  if (!message.value.trim()) {
    errors.push({
      element: message,
      groupId: "messageGroup",
      message: "お問い合わせ内容を入力してください"
    });
  } else if (message.value.trim().length < 10) {
    errors.push({
      element: message,
      groupId: "messageGroup",
      message: "お問い合わせ内容を10文字以上入力してください"
    });
  }

  // エラー表示
  errors.forEach((error) => {
    const group = document.getElementById(error.groupId);
    group.classList.add("error");

    const errorMessage = group.querySelector(".error-message");
    errorMessage.textContent = error.message;
  });

  return errors;
}

function scrollToFirstError(errors) {
  if (errors.length === 0) return;

  // 最初のエラー項目にスクロール
  const firstErrorGroup = document.getElementById(errors[0].groupId);

  firstErrorGroup.scrollIntoView({
    behavior: "smooth",
    block: "center" // 画面中央に表示
  });

  // 少し遅れてフォーカス
  setTimeout(() => {
    errors[0].element.focus();
  }, 500);

  console.log(
    `${errors.length}件のエラーが見つかりました。最初のエラー項目にスクロールしました。`
  );
}

function clearAllErrors() {
  const errorGroups = document.querySelectorAll(".form-group.error");
  errorGroups.forEach((group) => {
    group.classList.remove("error");
  });
}

function showSuccessMessage() {
  const successMessage = document.getElementById("successMessage");
  successMessage.style.display = "block";

  // 成功メッセージまでスクロール
  successMessage.scrollIntoView({
    behavior: "smooth",
    block: "start"
  });

  // フォームをリセット
  document.getElementById("contactForm").reset();

  // 3秒後に成功メッセージを非表示
  setTimeout(() => {
    successMessage.style.display = "none";
  }, 3000);
}

// リアルタイムバリデーション(エラー解除)
["name", "email", "phone", "company", "subject", "message"].forEach(
  (fieldId) => {
    const field = document.getElementById(fieldId);
    const group = document.getElementById(fieldId + "Group");

    field.addEventListener("input", function () {
      if (group.classList.contains("error")) {
        // 入力があったらエラー状態を解除
        if (this.value.trim()) {
          group.classList.remove("error");
        }
      }
    });
  }
);
コストパフォーマンスに優れた高性能なレンタルサーバー
【Hostinger】SEO・アクセシビリティを意識したスムーズスクロール設計
ユーザー体験向上の効果
スムーズスクロールは単なる装飾ではなく、以下のようなUX向上効果があります:
- 視覚的な連続性 – ユーザーがどこに移動したかを理解しやすい
- 自然な操作感 – 突然の画面変化による違和感を軽減
- コンテンツの認識 – スクロール中に途中のコンテンツも視認できる
- 直感的なナビゲーション – ページ構造を把握しやすい
アクセシビリティ配慮の実装
▼HTML
<!-- スキップリンク -->
<a href="#main-content" class="skip-link">メインコンテンツにスキップ</a>

<!-- アクセシビリティ設定 -->
<div class="accessibility-controls">
  <h3 style="margin: 0 0 10px 0; font-size: 14px;">アクセシビリティ設定</h3>
  <button id="toggleSmooth" class="toggle-button active" aria-pressed="true">
    スムーズスクロール
  </button>
  <button id="toggleFocus" class="toggle-button" aria-pressed="false">
    フォーカス強調
  </button>
</div>

<!-- ナビゲーション -->
<nav class="nav-container" role="navigation" aria-label="メインナビゲーション">
  <ul class="nav-list">
    <li><a href="#section1" class="nav-link" data-target="section1">セクション1</a></li>
    <li><a href="#section2" class="nav-link" data-target="section2">セクション2</a></li>
    <li><a href="#section3" class="nav-link" data-target="section3">セクション3</a></li>
    <li><a href="#section4" class="nav-link" data-target="section4">セクション4</a></li>
  </ul>
</nav>

<!-- メインコンテンツ -->
<main id="main-content">
  <section id="section1" class="section" tabindex="-1">
    <h2>セクション1:アクセシビリティ対応</h2>
    <p>このページは以下のアクセシビリティ機能を実装しています:</p>
    <ul>
      <li>スキップリンクによるナビゲーションのスキップ</li>
      <li>キーボードナビゲーション対応</li>
      <li>prefers-reduced-motionによるアニメーション制御</li>
      <li>適切なARIAラベルの使用</li>
      <li>フォーカス管理とアウトライン表示</li>
    </ul>
  </section>

  <section id="section2" class="section" tabindex="-1">
    <h2>セクション2:スムーズスクロールの効果</h2>
    <p>スムーズスクロールは以下のような効果を提供します:</p>
    <ul>
      <li><strong>視覚的連続性</strong> - どこに移動したかが分かりやすい</li>
      <li><strong>自然な操作感</strong> - 突然の変化による違和感を軽減</li>
      <li><strong>コンテンツ認識</strong> - スクロール中も内容を確認可能</li>
    </ul>
    <p>ただし、前庭障害のあるユーザーには配慮が必要です。</p>
  </section>

  <section id="section3" class="section" tabindex="-1">
    <h2>セクション3:パフォーマンス考慮</h2>
    <p>スムーズスクロール実装時のパフォーマンス考慮事項:</p>
    <ul>
      <li>CSS scroll-behaviorとJavaScriptの使い分け</li>
      <li>長距離スクロール時の処理負荷</li>
      <li>モバイルデバイスでのバッテリー消費</li>
      <li>インタラクション中の他イベント処理</li>
    </ul>
  </section>

  <section id="section4" class="section" tabindex="-1">
    <h2>セクション4:SEO効果</h2>
    <p>スムーズスクロールがSEOに与える影響:</p>
    <ul>
      <li><strong>滞在時間の向上</strong> - ユーザーエクスペリエンスの改善により滞在時間が延びる</li>
      <li><strong>直帰率の改善</strong> - スムーズなナビゲーションにより離脱を防ぐ</li>
      <li><strong>ページ内リンクの活用</strong> - 適切な内部リンク構造でクローラビリティ向上</li>
      <li><strong>Core Web Vitalsへの配慮</strong> - 適切な実装でページ体験スコア向上</li>
    </ul>
  </section>
</main>
▼CSS
body {
  margin: 0;
  font-family: Arial, sans-serif;
  line-height: 1.6;
}

/* prefers-reduced-motionメディアクエリでアニメーション制御 */
@media (prefers-reduced-motion: reduce) {
  * {
    scroll-behavior: auto !important;
    transition: none !important;
    animation: none !important;
  }
}

.skip-link {
  position: absolute;
  top: -40px;
  left: 6px;
  background: #000;
  color: #fff;
  padding: 8px;
  text-decoration: none;
  z-index: 9999;
  transition: top 0.3s ease;
}

.skip-link:focus {
  top: 6px;
}

.nav-container {
  background-color: #1976d2;
  color: white;
  padding: 15px 0;
  position: sticky;
  top: 0;
  z-index: 1000;
}

.nav-list {
  list-style: none;
  display: flex;
  justify-content: center;
  margin: 0;
  padding: 0;
  flex-wrap: wrap;
  gap: 20px;
}

.nav-link {
  color: white;
  text-decoration: none;
  padding: 10px 15px;
  border-radius: 4px;
  transition: background-color 0.3s ease;
  position: relative;
}

.nav-link:hover,
.nav-link:focus {
  background-color: rgba(255, 255, 255, 0.1);
  outline: 2px solid #ffeb3b;
  outline-offset: 2px;
}

.nav-link[aria-current="true"] {
  background-color: rgba(255, 255, 255, 0.2);
  font-weight: bold;
}

.section {
  min-height: 500px;
  padding: 60px 40px;
  scroll-margin-top: 80px;
}

.section:nth-child(even) {
  background-color: #f5f5f5;
}

.section h2 {
  color: #1976d2;
  margin-bottom: 20px;
}

/* フォーカス表示の改善 */
.section:target {
  outline: 3px solid #ff9800;
  outline-offset: 10px;
}

.accessibility-controls {
  position: fixed;
  top: 20px;
  right: 20px;
  background: white;
  padding: 15px;
  border: 1px solid #ccc;
  border-radius: 8px;
  box-shadow: 0 2px 10px rgba(0, 0, 0, 0.1);
  z-index: 999;
}

.toggle-button {
  padding: 8px 12px;
  margin: 5px;
  border: 1px solid #ccc;
  background: white;
  cursor: pointer;
  border-radius: 4px;
  font-size: 14px;
}

.toggle-button.active {
  background-color: #4caf50;
  color: white;
}
▼Javascript
// スムーズスクロール設定の管理
let smoothScrollEnabled = true;
let focusEnhancementEnabled = false;

// prefers-reduced-motionの検出
const prefersReducedMotion = window.matchMedia(
  "(prefers-reduced-motion: reduce)"
);

function updateSmoothScrollSetting() {
  if (prefersReducedMotion.matches) {
    smoothScrollEnabled = false;
    document.getElementById("toggleSmooth").textContent =
      "スムーズスクロール (無効)";
    document.getElementById("toggleSmooth").classList.remove("active");
  }
}

// 初期設定
updateSmoothScrollSetting();

// メディアクエリの変更を監視
prefersReducedMotion.addEventListener("change", updateSmoothScrollSetting);

// アクセシブルなスムーズスクロール関数
function accessibleScrollIntoView(targetId) {
  const target = document.getElementById(targetId);
  if (!target) return false;

  const options = {
    block: "start"
  };

  // ユーザー設定とprefers-reduced-motionを考慮
  if (smoothScrollEnabled && !prefersReducedMotion.matches) {
    options.behavior = "smooth";
  }

  target.scrollIntoView(options);

  // スクリーンリーダー用のフォーカス管理
  setTimeout(
    () => {
      target.focus();

      // aria-currentの更新
      updateCurrentNavigation(targetId);

      // フォーカス強調が有効な場合の処理
      if (focusEnhancementEnabled) {
        target.style.outline = "3px solid #ff9800";
        target.style.outlineOffset = "10px";

        setTimeout(() => {
          target.style.outline = "";
          target.style.outlineOffset = "";
        }, 2000);
      }
    },
    smoothScrollEnabled ? 500 : 0
  );

  return true;
}

// ナビゲーションの現在位置更新
function updateCurrentNavigation(currentId) {
  const navLinks = document.querySelectorAll(".nav-link");
  navLinks.forEach((link) => {
    const targetId = link.getAttribute("data-target");
    if (targetId === currentId) {
      link.setAttribute("aria-current", "true");
    } else {
      link.removeAttribute("aria-current");
    }
  });
}

// ナビゲーションリンクのイベント設定
document.querySelectorAll(".nav-link").forEach((link) => {
  link.addEventListener("click", function (e) {
    e.preventDefault();
    const targetId = this.getAttribute("data-target");
    accessibleScrollIntoView(targetId);

    // ブラウザ履歴の更新(SEO対応)
    history.pushState(null, null, "#" + targetId);
  });

  // キーボードナビゲーション対応
  link.addEventListener("keydown", function (e) {
    if (e.key === "Enter" || e.key === " ") {
      e.preventDefault();
      this.click();
    }
  });
});

// アクセシビリティ設定の制御
document.getElementById("toggleSmooth").addEventListener("click", function () {
  if (!prefersReducedMotion.matches) {
    smoothScrollEnabled = !smoothScrollEnabled;
    this.classList.toggle("active");
    this.setAttribute("aria-pressed", smoothScrollEnabled.toString());
  }
});

document.getElementById("toggleFocus").addEventListener("click", function () {
  focusEnhancementEnabled = !focusEnhancementEnabled;
  this.classList.toggle("active");
  this.setAttribute("aria-pressed", focusEnhancementEnabled.toString());
});

// ページ読み込み時のハッシュ処理
window.addEventListener("load", function () {
  if (window.location.hash) {
    const targetId = window.location.hash.substring(1);
    setTimeout(() => {
      accessibleScrollIntoView(targetId);
    }, 100);
  }
});

// スクロール位置の監視(Intersection Observer使用)
const observerOptions = {
  root: null,
  rootMargin: "-20% 0px -70% 0px",
  threshold: 0
};

const observer = new IntersectionObserver((entries) => {
  entries.forEach((entry) => {
    if (entry.isIntersecting) {
      updateCurrentNavigation(entry.target.id);
    }
  });
}, observerOptions);

// 全セクションを監視対象に追加
document.querySelectorAll("section[id]").forEach((section) => {
  observer.observe(section);
});
実際の表示
See the Pen scrollintoview-11 by watashi-xyz (@watashi-xyz) on CodePen.
格安ドメイン取得サービス─ムームードメイン─パフォーマンス最適化のベストプラクティス
// デバウンス処理でパフォーマンスを向上
function debounce(func, wait) {
    let timeout;
    return function executedFunction(...args) {
        const later = () => {
            clearTimeout(timeout);
            func(...args);
        };
        clearTimeout(timeout);
        timeout = setTimeout(later, wait);
    };
}

// スクロールイベントの最適化
const optimizedScrollHandler = debounce(function() {
    // スクロール処理
    updateScrollProgress();
}, 16); // 約60FPSに制限

window.addEventListener('scroll', optimizedScrollHandler);

// CSS scroll-behaviorとの併用例
function hybridSmoothScroll(targetId) {
    const target = document.getElementById(targetId);
    if (!target) return;

    // モダンブラウザはCSS、古いブラウザはJavaScript
    if ('scrollBehavior' in document.documentElement.style) {
        document.documentElement.style.scrollBehavior = 'smooth';
        target.scrollIntoView({ block: 'start' });

        // アニメーション完了後にリセット
        setTimeout(() => {
            document.documentElement.style.scrollBehavior = 'auto';
        }, 1000);
    } else {
        // フォールバック実装
        target.scrollIntoView({ behavior: 'smooth', block: 'start' });
    }
}
SEO効果を最大化する実装のコツ
1.構造化マークアップの活用
<!-- JSON-LD構造化データでページ構造を明示 -->
<script type="application/ld+json">
{
    "@context": "<https://schema.org>",
    "@type": "WebPage",
    "mainEntity": {
        "@type": "Article",
        "headline": "scrollIntoView完全ガイド",
        "author": {
            "@type": "Organization",
            "name": "Your Company"
        }
    }
}
</script>
2.適切なHTML5セマンティクス
<main role="main">
    <article>
        <nav role="navigation" aria-label="ページ内ナビゲーション">
            <!-- ナビゲーション -->
        </nav>
        <section id="introduction">
            <h2>はじめに</h2>
            <!-- コンテンツ -->
        </section>
    </article>
</main>
3.内部リンク構造の最適化
// アンカーリンクのSEO対応
function seoFriendlyScroll(targetId) {
    const target = document.getElementById(targetId);
    if (!target) return;

    // Google Analyticsでのイベント追跡
    if (typeof gtag !== 'undefined') {
        gtag('event', 'scroll_to_section', {
            'section_id': targetId,
            'engagement_time_msec': Date.now()
        });
    }

    // スクロール実行
    target.scrollIntoView({ behavior: 'smooth', block: 'start' });

    // URLの更新(検索エンジンのためのシグナル)
    if (history.pushState) {
        history.pushState(null, null, '#' + targetId);
    }
}
scrollIntoViewの活用例と応用テクニックをマスターすることで、以下のような高品質なWebサイトを構築できます:
- ユーザビリティの向上 – 直感的なナビゲーションとスムーズな操作感
- アクセシビリティの確保 – すべてのユーザーが利用可能なインターフェース
- SEO効果の最大化 – 検索エンジンに評価される内部リンク構造
- パフォーマンスの最適化 – 軽快な動作とバッテリー消費の抑制
これらの実装パターンを参考に、あなたのプロジェクトに最適なスムーズスクロール機能を実装してください。
【不要なパソコンを送るだけ】パソコン無料処分サービス『送壊ゼロ』よくある質問(FAQ)
-
scrollIntoViewはjQueryでどう書く? -
jQueryには
scrollIntoView()に直接相当するメソッドはありません。代わりに、animate()メソッドを使用してスクロールを実装するのが一般的です。animate()を使えば、より柔軟なアニメーション制御が可能になります。▼JavaScript
// jQueryでスムーズスクロールを実装する例
$('html, body').animate({
  scrollTop: $('#target-element').offset().top
}, 500); // 500msでスクロール
このコードは、指定した要素(
#target-element)のページ上部からの位置(offset().top)まで、htmlとbody要素を500ミリ秒かけてアニメーションさせます。
-
CSSの
scroll-behavior: smooth;とscrollIntoViewの違いは? -
この2つはどちらもスムーズスクロールを実装できますが、役割が異なります。
scroll-behavior: smooth;はCSSのプロパティです。これをhtmlやbodyに指定しておくと、アンカーリンク(<a>タグ)をクリックした時など、ブラウザのデフォルトのスクロール挙動がすべてスムーズになります。JavaScriptによるスクロールにも影響します。scrollIntoView()はJavaScriptのメソッドです。これは、任意のタイミングで特定の要素までスクロールさせる「動作」を命令するために使います。CSSプロパティとは異なり、JavaScriptのコードとして実行されます。両者を組み合わせることで、JavaScriptでのスクロールもより滑らかになります。
-
ブラウザの対応状況は?
-
scrollIntoView()は主要なモダンブラウザ(Chrome、Firefox、Safari、Edgeなど)のほとんどでサポートされています。ただし、Internet Explorerではサポートされていません。もし古いブラウザにも対応する必要がある場合は、scrollintoview-polyfillなどのライブラリを使用するか、jQueryのanimate()のような代替手段を検討すると良いでしょう。
まとめ
この記事では、JavaScriptのscrollIntoViewについて、基本的な使い方から実践的な応用テクニックまで詳しく解説してきました。scrollIntoViewは、ユーザー体験を大きく向上させる強力な機能である一方、正しく実装するためにはいくつかの重要なポイントがあります。
まず、scrollIntoViewの最大の魅力は実装の簡単さです。従来のwindow.scrollToを使った複雑な座標計算は必要なく、目的の要素を指定するだけでスムーズなスクロールが実現できます。特に、レスポンシブデザインのサイトでは、画面サイズによって要素の位置が変わる中で、自動的に正確な位置を計算してくれる点が非常に便利です。
しかし、実際のWebサイトでは固定ヘッダーによる要素の隠れ問題がよく発生します。この問題は、CSSのscroll-margin-topプロパティを使うことで、JavaScript側の複雑な処理なしに美しく解決できます。この手法は保守性が高く、デザインの変更にも柔軟に対応できるため、モダンな開発現場では標準的なアプローチとなっています。
実践面では、フォームのエラー箇所への自動スクロールや、ページトップへ戻るボタンの実装など、ユーザビリティを大幅に向上させる具体的な活用場面が数多くあります。これらの機能は、ユーザーの離脱を防ぎ、サイト内での滞在時間を延ばす効果があるため、SEOの観点からも非常に価値の高い実装です。
scrollIntoViewとwindow.scrollTo、CSSのscroll-behaviorなど、類似の機能との使い分けも重要なポイントです。要素ベースのスクロールならscrollIntoView、座標指定ならwindow.scrollTo、シンプルなページ内リンクならCSS scroll-behaviorといった使い分けを理解することで、より効率的な開発が可能になります。
最後に、scrollIntoViewの実装で最も大切なことは、技術的な完璧さを追求することではなく、ユーザーにとって自然で快適な操作感を提供することです。段階的機能向上の考え方で、基本機能から順次エンハンスしていけば、幅広い環境で動作する堅牢なWebサイトを構築できます。
この記事で紹介したテクニックを参考に、ぜひあなたのプロジェクトでもscrollIntoViewを活用して、ユーザー体験の向上を実現してください。適切に実装されたscrollIntoViewは、きっとサイトの価値を大きく高めてくれるはずです。